Introduction
Scalp Micropigmentation (SMP) is an innovative and non-invasive procedure that offers a solution for individuals dealing with hair loss, thinning hair, or receding hairlines. This advanced technique involves the application of tiny, natural pigments on the scalp, simulating the appearance of real hair follicles. SMP provides a long-lasting and realistic solution to create the illusion of a fuller head of hair, restore a receding hairline, or camouflage scars on the scalp. Whether you are experiencing male pattern baldness, female pattern hair loss, or any other form of hair thinning, SMP can help you regain confidence and achieve a more youthful and defined look. In this article, we will explore the details of scalp micropigmentation, including the procedure, benefits, considerations, and what to expect during and after the treatment.
What is Scalp Micropigmentation?
Scalp Micropigmentation (SMP) is an advanced cosmetic procedure that involves the application of specialized pigments onto the scalp to create the appearance of natural hair follicles. It is a non-surgical and non-invasive solution for individuals experiencing hair loss, thinning hair, or receding hairlines.
Scalp Micropigmentation Procedure?
- Consultation: The first step is to schedule a consultation with a qualified SMP practitioner. During this consultation, you can discuss your goals, concerns, and expectations. The practitioner will evaluate your scalp condition, hair loss pattern, and determine if you are a suitable candidate for SMP. They will also explain the procedure, answer any questions you may have, and discuss the desired outcome.
- Design and colour matching: The practitioner will work with you to create a customized treatment plan. They will consider factors such as your hair colour, skin tone, and desired hairline shape. The practitioner will use their expertise to design a natural-looking hairline and determine the appropriate shade of pigments to match your existing hair colour or desired appearance.
- Preparation: On the day of the procedure, the scalp will be thoroughly cleaned and prepared. The practitioner may trim any existing hair to ensure optimal results. They will also apply a topical numbing agent to minimize any potential discomfort during the procedure.
- Pigment application: Using specialized micro-needles or a tattooing device, the practitioner will deposit tiny pigments into the upper layer of the scalp. They will carefully replicate the appearance of natural hair follicles, adjusting the depth, density, and angle of the pigments to achieve a realistic and seamless result. The process is repeated until the entire treatment area is covered.
- Assessing the results: Once the pigments are applied, the practitioner will assess the results and make any necessary adjustments. They will ensure that the newly created hairline blends seamlessly with your existing hair and appears natural.
- Post-treatment care: After the procedure, the practitioner will provide you with specific post-treatment care instructions. This may include avoiding excessive sun exposure, refraining from touching or scratching the treated area, and using recommended aftercare products. It’s important to follow these instructions to ensure proper healing and long-lasting results.
- Follow-up sessions: Depending on the desired outcome and individual factors, multiple sessions may be required to achieve optimal results. Follow-up sessions are typically scheduled to add density, make adjustments, or address any areas that require further pigmentation.


Benefits of Scalp Micropigmentation Procedure?
- Natural-looking results: Micropigmentation creates the illusion of natural hair follicles, giving the appearance of a fuller head of hair or a restored hairline. The pigments are carefully matched to your hair colour and skin tone, ensuring a seamless and realistic outcome.
- Increased confidence: Hair loss can have a significant impact on a person’s self-esteem and confidence. Micropigmentation provides a solution that enhances your appearance, helping to restore confidence and improve your overall well-being.
- Non-invasive and safe: Unlike surgical hair restoration procedures, micropigmentation is a non-invasive treatment that does not require incisions or anaesthesia. It is a safe and low-risk procedure, minimizing the potential for complications or side effects.
- Minimal downtime: After the micropigmentation procedure, you can resume your normal activities relatively quickly. There is no significant downtime or recovery period associated with the treatment.
- Long-lasting results: Micropigmentation provides long-lasting results, allowing you to enjoy the benefits of a fuller head of hair or a defined hairline for an extended period. With proper care and maintenance, the results can last for several years.
- Versatility: Micropigmentation can be tailored to meet individual needs and desired outcomes. It can be used to address various forms of hair loss, including male pattern baldness, female pattern hair loss, alopecia, thinning hair, and even to camouflage scars or imperfections on the scalp.
- Low maintenance: Once the micropigmentation procedure is complete, the treated area requires minimal maintenance. Unlike traditional hair restoration methods, there is no need for daily styling, special shampoos, or ongoing treatments. Simply follow the aftercare instructions provided by your practitioner to maintain the longevity of the results.
- Suitable for various skin and hair types: Micropigmentation is suitable for individuals with different skin tones, hair colours, and hair textures. The procedure can be customized to match your unique characteristics and desired outcome.
- Timesaving: With micropigmentation, there is no need for daily shaving, styling, or application of topical hair loss products. This saves time in your daily routine and eliminates the stress associated with managing hair loss.
- Cost-effective: Compared to surgical hair restoration procedures, micropigmentation is a more affordable option. It provides long-lasting results without the need for ongoing treatments or maintenance, making it a cost-effective choice for many individuals.

Side effects of Micropigmentation Procedure?
- Redness and irritation: After the procedure, it’s common to experience some redness and mild irritation in the treated area. This is a normal response and usually subsides within a few days.
- Mild discomfort: During the procedure, you may experience mild discomfort or a sensation similar to a slight stinging or tingling. However, most people tolerate the procedure well, and any discomfort is typically minimal.
- Swelling: Some individuals may experience temporary swelling in the treated area. This is usually mild and resolves within a few days.
- Allergic reactions: Although rare, some individuals may have an allergic reaction to the pigments used in the procedure. It’s important to discuss any known allergies or sensitivities with your practitioner beforehand.
- Infection: While the risk of infection is minimal if proper hygiene practices are followed, there is still a small possibility. It’s important to keep the treated area clean and follow the aftercare instructions provided by your practitioner to minimize the risk of infection.
- Color changes: Over time, the pigments used in micropigmentation may undergo some fading or colour changes. This can happen due to factors such as sun exposure, aging, or individual skin characteristics. Periodic touch-up sessions may be required to maintain the desired colour and intensity.
Pre-Care for Micropigmentation Removal
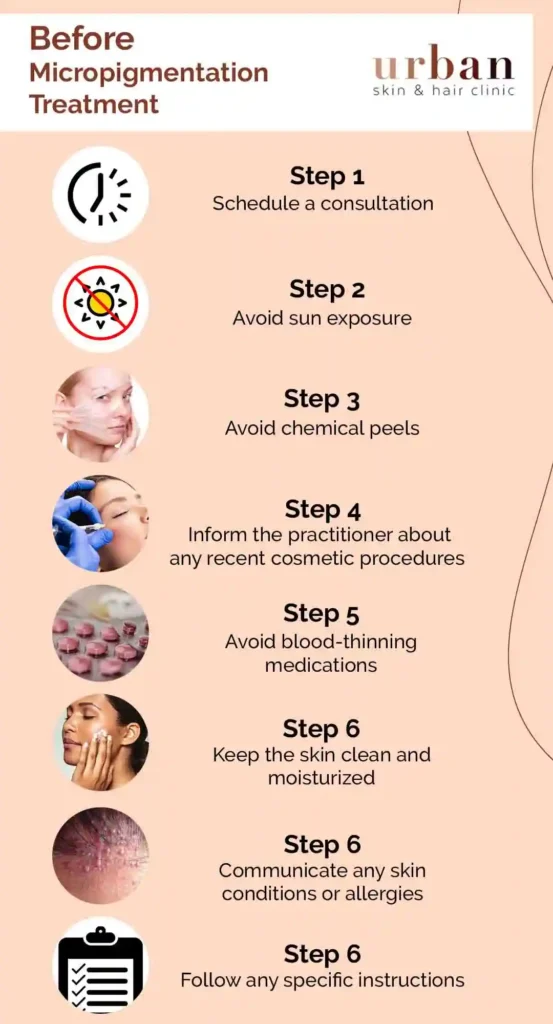
- Consultation: Schedule a consultation with a qualified and experienced professional who specializes in micropigmentation removal. Discuss your concerns, expectations, and any medical conditions or medications that may affect the procedure.
- Avoid sun exposure: Minimize sun exposure to the treated area for at least two weeks prior to the removal procedure. Sunburned or tanned skin can be more sensitive and prone to complications during the removal process.
- Avoid chemical peels and other treatments: Refrain from undergoing chemical peels, laser treatments, or any other aggressive skincare treatments on the area being treated. These procedures can interfere with the removal process or increase the risk of adverse reactions.
- Inform the practitioner about any recent procedures: Inform your micropigmentation removal specialist about any recent cosmetic procedures or treatments you have undergone. This includes micro needling, dermal fillers, or Botox injections in the area being treated. They will advise you on the appropriate timing for the removal procedure.
- Avoid blood-thinning medications: If you are taking blood-thinning medications or supplements, such as aspirin or fish oil, consult your healthcare provider about whether it is safe to temporarily discontinue them before the removal procedure. These medications can increase the risk of bleeding and bruising during the process.
- Keep the skin clean and moisturized: Prior to the removal procedure, maintain good skincare practices by keeping the area clean and moisturized. This promotes healthy skin and aids in the healing process.
- Communicate any skin conditions or allergies: Inform your micropigmentation removal specialist about any pre-existing skin conditions, allergies, or sensitivities you may have. This information helps them tailor the removal process to your specific needs and minimize the risk of adverse reactions.
- Follow any specific instructions: Your micropigmentation removal specialist may provide you with specific pre-care instructions based on the removal technique being used. Follow these instructions carefully to prepare your skin for the procedure and optimize the results.


After Care for Micropigmentation Removal
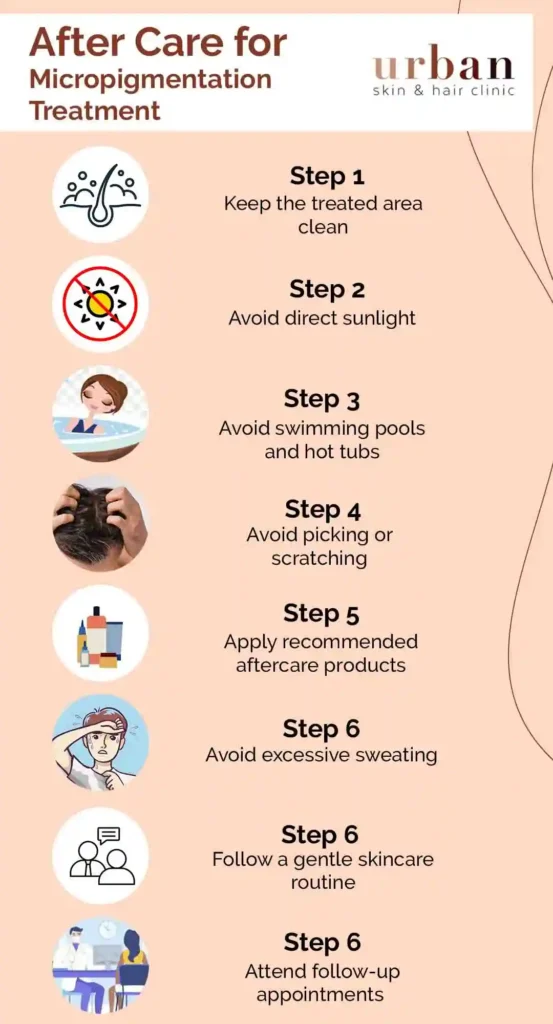
- Keep the treated area clean: Gently cleanse the treated area using a mild, fragrance-free cleanser and lukewarm water. Avoid using harsh or abrasive products that can irritate the skin. Pat the area dry with a clean towel or allow it to air dry.
- Avoid direct sunlight and tanning beds: Protect the treated area from sun exposure for at least two weeks after micropigmentation removal. Sunlight can cause hyperpigmentation or skin damage during the healing process. If you need to be outside, wear protective clothing and use a broad-spectrum sunscreen with a high SPF.
- Avoid swimming pools and hot tubs: Refrain from swimming in chlorinated pools or using hot tubs during the initial healing period. Prolonged exposure to chlorinated water or excessive moisture can interfere with the healing process and increase the risk of infection.
- Avoid picking or scratching: It’s essential to resist the urge to pick, scratch, or peel the treated area. Doing so can disrupt the healing process, increase the risk of scarring, and prolong the recovery time.
- Apply recommended aftercare products: Your micropigmentation removal specialist may provide you with specific aftercare products to apply to the treated area. Follow their instructions and apply any prescribed creams or ointments as directed. These products can help soothe the skin, promote healing, and prevent infection.
- Avoid excessive sweating and physical activities: Minimize activities that cause excessive sweating or strain on the treated area for at least one week after the removal procedure. Sweating and friction can irritate the skin and potentially affect the healing process.
- Follow a gentle skincare routine: Maintain a gentle skincare routine, avoiding exfoliants, harsh chemicals, or abrasive skincare products on the treated area until it is fully healed. opt for gentle, fragrance-free products to cleanse and moisturize the skin.
- Attend follow-up appointments: Depending on the removal technique used, you may need to schedule follow-up appointments with your micropigmentation removal specialist. These visits allow them to assess the healing progress, address any concerns, and perform any necessary touch-ups.
- Be patient: The healing process can vary from person to person, and it may take several weeks for the treated area to fully heal. It’s important to be patient and allow your skin the necessary time to recover.
Consult a Specialist Today
FAQ for Scalp Micropigmentation Treatment
While micropigmentation is generally safe, there can be potential side effects. These can include temporary redness, swelling, tenderness, and mild itching at the treatment site. In rare cases, allergic reactions or infections can occur. It’s important to follow proper aftercare instructions and seek professional advice if you experience any persistent or concerning side effects.
Yes, over time, micropigmentation can fade or change in color. Factors such as sun exposure, skincare routine, and individual skin characteristics can influence the longevity and appearance of the pigments. Periodic touch-ups may be required to maintain the desired color and vibrancy.
Why Urban Skin and Hair Clinic

TEAM OF CERTIFIED DERMATOLOGISTS

US-FDA APPROVED EQUIPMENTS

HIGHLY STANDARDISED PROTOCOLS

1 LAKH + HAPPY CLIENTS
Scalp Micropigmentation Results Before & After


